Pipe Inspection Camera Guide: Petrochemical & Pipeline NDT Field Manual | JEET
A refinery doesn't shut down for a routine inspection — it shuts down because something failed. By the time corrosion in a heat exchanger tube bundle becomes visible on a process control screen, you are already losing thousands of dollars per hour in lost throughput. The right pipe inspection camera turns that crisis-driven maintenance cycle into a planned, budgeted, and documented integrity program. This field manual covers what actually matters when you deploy a borescope inside a petrochemical facility: which inspection points carry the highest risk, what probe specifications survive hydrocarbon environments, how to produce records that satisfy API 510 and API 653, and how digital reporting connects inspection data to your mechanical integrity system.
Whether you are specifying equipment for a new turnaround campaign or replacing aging fiberscopes that technicians refuse to use, the guidance below reflects what happens on the platform — not the catalog page version.
1. Why Pipe Inspection Cameras Are Non-Negotiable in Petrochemical Ops
Petrochemical facilities operate under a mechanical integrity framework mandated by OSHA's Process Safety Management (PSM) standard (29 CFR 1910.119) and EPA's Risk Management Program (RMP). Both regulations require documented inspection of pressure-containing equipment — and visual inspection via borescope is the primary NDT method for internal surfaces that cannot be examined externally. A pipe inspection camera is not a convenience tool; it is a compliance instrument.
$1.6B
average annual cost of corrosion in U.S. petroleum refining (NACE International estimate)
40–60%
of unplanned shutdowns in refining are caused by equipment failure traceable to corrosion or erosion
10:1
ROI ratio — every $1 spent on planned borescope inspection saves ~$10 in unplanned failure costs
The economics are brutal in one direction: a single failed tube bundle in a crude unit pre-heat exchanger can force a unit shutdown costing $50,000–$200,000 per day in lost production. The same failure, caught early during a scheduled borescope inspection, is a planned work order — not an emergency.
Regulatory note: OSHA 1910.119(j) requires that each inspection of pressure vessels and piping be documented with date, inspector name, equipment description, inspection method, and results. API 510 Section 6.5 further requires that internal visual inspections include "the condition of internal components, welds, and corrosion." A borescope image with metadata is the most defensible form of this record.
2. 6 Critical Inspection Points in a Petrochemical Facility
Not every component in a refinery is a borescope target — but the ones that are tend to share three characteristics: they contain corrosive or erosive process fluids, they cannot be fully inspected externally, and their failure has safety or production consequences. Here are the six inspection points where a pipe borescope delivers the highest value.
3. Equipment Specs for Harsh Hydrocarbon Environments
A petrochemical facility is not a clean room. Residual hydrocarbons, H₂S gas, high humidity, elevated temperatures, and confined-space entry constraints all shape what your pipe inspection camera must survive. The table below shows the minimum and recommended specifications for each inspection point.
| Inspection Point | Probe OD | Working Length | Min Resolution | Articulation | Environmental |
|---|---|---|---|---|---|
| Heat Exchanger Tubes | 6–10 mm | 3–10 m | 1080p | Forward + side-view tips | IP67, hydrocarbon-resistant sheath |
| Pressure Vessel Internals | 6–8 mm | 2–5 m | 1080p | 4-way, ≥180° | IP67, stereo measurement |
| Storage Tank Floors/Shells | 10–15 mm (push cam) | 10–30 m | 1080p | PTZ or interchangeable lens | IP68, vapor-tight housing |
| Process Piping & Elbows | 8–15 mm | 5–30 m | 1080p | Flexible push, multi-tip | IP67, chemical-resistant jacket |
| Furnace/Boiler Tubes | 8–12 mm | 3–8 m | 1080p | Forward + 90° side-view | Tip rated ≥150°C, high-lumen LED |
| Valve & Pump Internals | 4–6 mm | 1–2 m | 1080p | 4-way, ≥160° | IP67, stereo measurement |
Chemical Compatibility of Probe Sheath
The insertion tube outer jacket will contact residual hydrocarbons, amine solutions, caustic, and acid gas residues. Tungsten-braided sheaths offer the best chemical resistance for sustained petrochemical use. Standard PVC or rubber sheaths may degrade, swell, or crack after repeated exposure — verify the sheath material rating against your process chemical list before purchasing.
Hazardous Area Certification
If the borescope will be used in classified areas (Class I Div 1/2 or ATEX Zone 1/2), the equipment must carry appropriate explosion-proof or intrinsically safe certification. Most commercial inspection cameras are not rated for hazardous locations. Verify the certification label matches your facility's area classification drawing before deploying the equipment on the operating unit.
4. A Compliant 6-Step Inspection Workflow
An inspection that is not documented did not happen. An inspection that is documented but not repeatable has no trending value. The workflow below satisfies both OSHA PSM mechanical integrity requirements and API inspection standards — and it produces data your reliability engineers can actually use.
Pre-job safety and isolation verification
Confirm the equipment is properly isolated, depressurized, drained, and purged per your facility's lockout/tagout (LOTO) procedure. Verify gas-free certification for confined space entry (if required). Check area classification — if working in a hazardous area, confirm the borescope carries the appropriate ATEX/IECEx or Class I Division certification. Complete the confined space entry permit and job safety analysis (JSA).
Equipment setup and calibration check
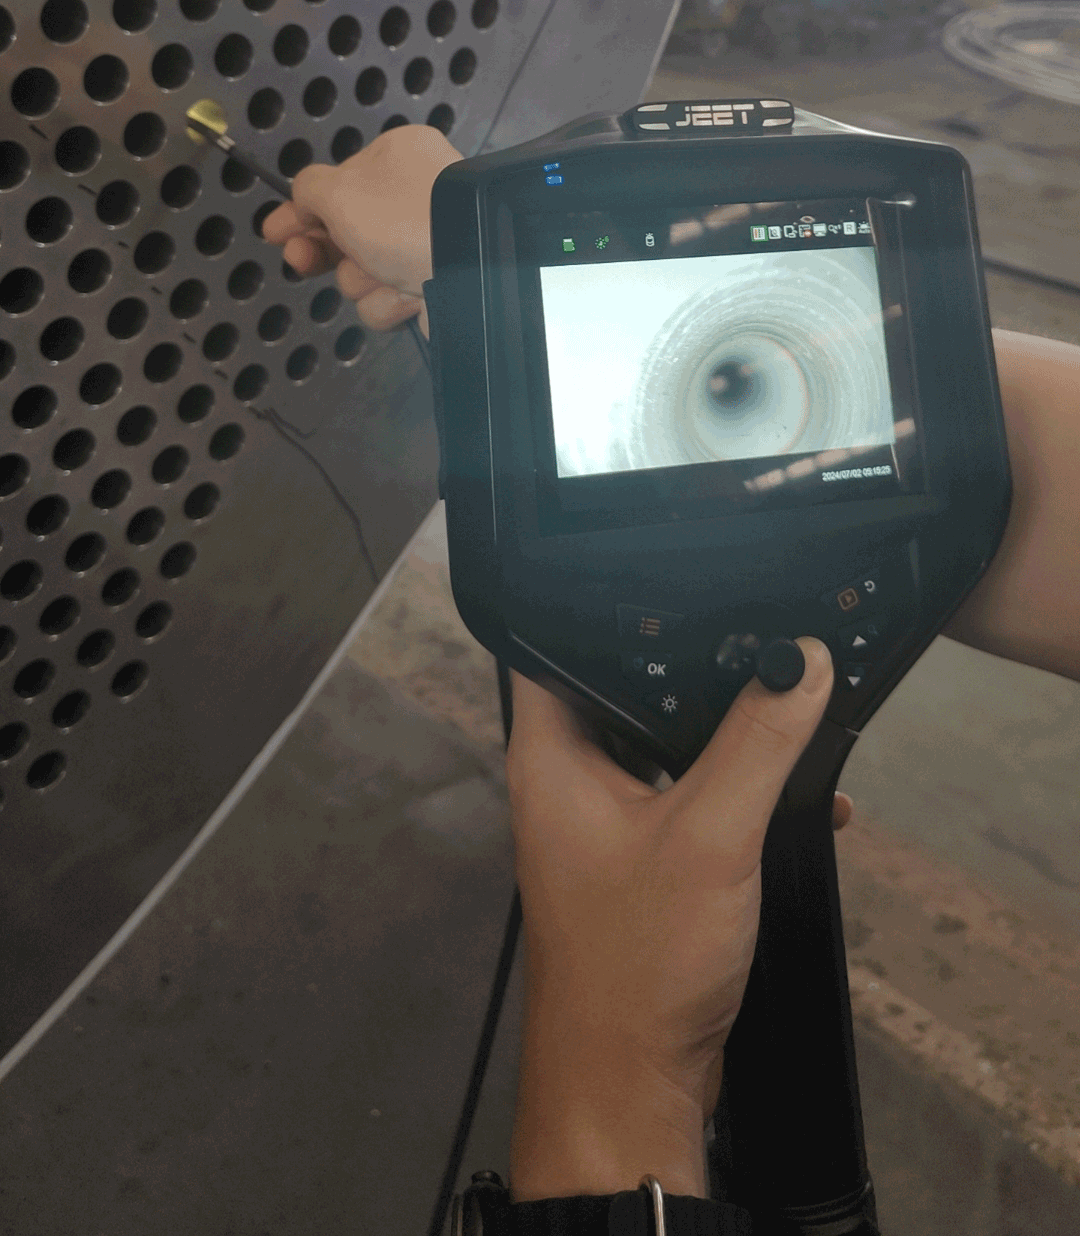
Verify probe diameter is compatible with the access port or tube ID. Check articulation full-range function and camera focus. If the system includes a measurement module, perform the pre-inspection calibration verification using the reference gauge block. Set date/time stamp on the recording — this metadata is critical for regulatory traceability. Insert a clean, dry probe — residual moisture on the lens will produce false "pitting" indications.
Systematic coverage with continuous video recording
Record continuously from probe insertion to withdrawal. For tube bundle inspections, note the tube row and column position verbally into the audio track at each tube entry. For vessel internals, follow a defined survey path (clockwise from entry point) and document each internal component by name. Never advance the probe by feel — always monitor the live image to prevent probe snagging on internal hardware.
Defect identification, measurement, and classification
When a suspected defect is found, freeze the frame. Apply measurement annotations (depth, length, width) using the on-board measurement module. Save both the annotated image and the raw unprocessed still. Classify the finding: corrosion (general/pitting), cracking, erosion, mechanical damage, or deposit. Record the location reference (tube number, weld ID, clock position) and the applicable acceptance criterion from the inspection standard being applied.
Comparison with previous inspection data
If this is a repeat inspection (not first-baseline), pull the previous inspection record for the same equipment and CML. Compare current findings against historical images at the same location. Calculate corrosion rate (mm/year) from wall loss measurements taken at identical positions. Flag any finding that represents a significant rate change — this triggers a re-evaluation of the inspection interval and remaining life calculation under API 510/580 RBI methodology.
Report generation and MI system upload
Compile the inspection report: equipment ID, tag number, inspection date, inspector name and certification, inspection method and standard, all findings with annotated images, corrosion rates (if repeat inspection), disposition (continue in service / repair / rerate / replace), and recommended next inspection date. Upload the report and all image/video files to your mechanical integrity (MI) database or inspection data management system (IDMS) such as APIDocs, PCMS, or equivalent.
Workflow tip: Build a standardized inspection task card for each equipment type in your facility (e.g., "Shell-and-tube exchanger, crude unit, P-101"). The task card defines the tube survey count, CML list, and acceptance criteria — ensuring that findings are comparable across inspectors and across turnaround cycles. This is the single most effective step for building a trendable corrosion monitoring database.
5. API, ASME & OSHA Documentation Requirements
Petrochemical inspection is a regulated activity. The standards below define not just what to inspect but how to document it — and a borescope image with embedded metadata is the most defensible evidence an inspector can produce. Here is what each framework requires.
API 510 (Pressure Vessels)
- Inspector certification (API 510 Certified)
- Internal/external inspection intervals per Section 6
- Condition monitoring locations (CMLs) documented
- Corrosion rate calculation and remaining life
- Photographic evidence of all findings
- RBI program reference (if applicable per API 580)
API 653 (Storage Tanks)
- Internal inspection interval per Appendix C
- Floor scan (MFL) + visual verification
- Shell and roof inspection (internal + external)
- Settlement and foundation assessment
- Coating and lining condition documentation
- Out-of-service vs. in-service inspection scope
OSHA PSM (1910.119)
- Mechanical integrity program documentation
- Inspection and testing frequency per RAGAGEP
- Equipment-specific inspection procedures
- Documentation of deficiencies (1910.119(j)(5))
- Quality assurance for new/replaced equipment
- Training records for inspection personnel
⚠️ Common compliance gap: Many facilities log "visual inspection complete" without documenting the specific CMLs surveyed, the probe access route, or the comparison basis against prior inspections. An API 510 auditor will ask: "Show me the image from this CML at the last three inspection cycles." If you cannot produce a side-by-side comparison, the inspection is not defensible as a mechanical integrity record.
6. Digital Reporting & Predictive Maintenance Integration
The borescope itself is only half the system. The other half — increasingly the more valuable half — is the digital reporting workflow that connects inspection images to your mechanical integrity database, your RBI (risk-based inspection) program, and ultimately your turnaround planning cycle. Modern pipe inspection cameras are not standalone devices; they are data acquisition front-ends for a reliability engineering pipeline.
✅ What Modern Digital Reporting Enables
- Auto-tagged images with GPS, timestamp, and equipment ID
- Side-by-side comparison with prior cycle at same CML
- Automated corrosion rate calculation from wall loss data
- One-click export to IDMS (PCMS, APIDocs, Meridium)
- Cloud-based report sharing with remote engineering review
- Trendable remaining-life charts across inspection cycles
⚠️ What Still Requires Engineering Judgment
- Differentiating active corrosion from legacy damage
- CML selection and coverage strategy optimization
- RBI re-classification after significant findings
- Disposition when data is ambiguous or incomplete
- Root cause analysis for accelerated degradation
- Turnaround scope decisions based on inspection trends
The practical value of digital integration in 2026 is trending power. Facilities that maintain a consistent borescope image library across turnaround cycles — with standardized CMLs, comparable probe positions, and dated wall-loss measurements — can predict the next intervention date with significantly higher confidence than facilities relying on text-only inspection notes. This translates directly into fewer unplanned shutdowns and more efficient turnaround scope.
Inspecting a specific equipment type?
Tell us your tube ID range, access port diameter, working length requirement, and area classification — our applications engineers will confirm probe compatibility and recommend the optimal configuration for your facility.
Request configuration recommendation →8. Frequently Asked Questions
Summary
Effective pipe inspection in petrochemical facilities requires the right probe geometry for each inspection point, a systematic coverage protocol that produces trendable data, and documentation that satisfies OSHA PSM, API 510, and API 653 requirements. A dual-equipment approach — long-range push cameras for tube and pipe runs, articulated video borescopes for vessel and valve internals — covers the full spectrum of facility inspection needs. Digital reporting that connects borescope images to your mechanical integrity database transforms each inspection from a compliance task into a predictive maintenance data point.
[FILL: Brand] designs and manufactures industrial pipe inspection cameras and video borescopes specifically validated for petrochemical environments, with full technical support and direct access to application engineers who understand refinery access geometry and hazardous area requirements — not just camera specifications.
Request a quote or application consultation →